Showing posts with label Non-Stamping Projects. Show all posts

Jun 7, 2013

New Products and the fun they can be

Its been a while, but I finally had some free time today to be creative. I decided to finish up a few cards I've been working on, but also wanted to try out a new product SU has just released. I had so much fun with it, that I didn't get around to finishing my cards!

What's this new product you ask? Its called Simply Pressed Clay (#130685). Its not new to the craft world, but its the first time I've become excited about it since I first saw it. I used it with our Buttons & Blossoms (#131272) molds.

Clay Flowers!

The clay itself comes in a silver resealable envelope which contains 2.4 ounces. I know that sounds like a small amount, but its deceiving. It only takes a tiny amount to make one flower.

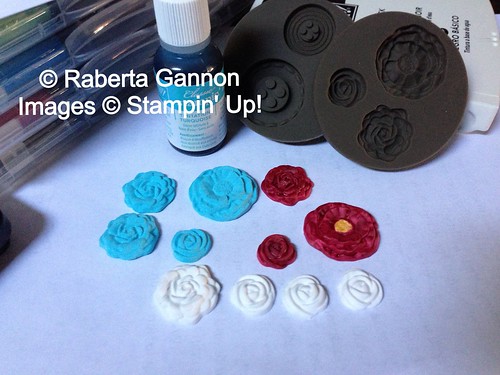
In the image above, I decided to try different ways of coloring the flowers. Above is only two ways, but there are just so many other options out there and I'm continuing to play. I will share as I learn more.

For the flowers in taken with teal, I used a re-inker and kneaded just two drops of color onto a small amount of clay. Be sure to use gloves or a zip lock bag or else you'll end up with stained fingers. :) The other flowers were colored using the brush side of our SU markers. I would also recommend letting the clay sit for a few minutes so that it is easier to remove from the molds. The heat from your hands can cause it to stick to the mold. If you find you're having a problem removing the clay, try placing the mold in the freezer for about 5 minutes.

Thanks for stopping by! I'll share more ideas as I come across them!

May 28, 2011

Knit Project - Using SU! Embellishments

I'm happy to share my first cross-post with my Everything But The Ink blog. I enjoy many different crafts and I got to use my Stampin' Up! embellishments in a non "paper craft" project.

My niece's birthday will be here in just a matter of weeks and I have been trying to decide what to make/get her. After some discussions with my sister-in-law, we decided that she would really love a painted pewter figurine. In addition to this, I decided to knit her a small pouch, which I would place the figurine in. 

This is the pouch I created.

I used worsted weight yarn in "Turqua" by Red Heart yarn. The button is a Stampin' Up! button in Baja Breeze. Unfortunantly it is a retired product. However, we have many great buttons that are current and a button in Pacific Point or Tempting Turquoise would have gone beautifully with it. I will need to add more buttons to my collection for my next project.

I hope you enjoyed my share!

Jun 23, 2010

Chic Fleece Flower Pins - Stampin' Up!

Hello fellow stampers!


Today I'm sharing with you an adorable flower pin I made on Friday using our Stampin' Up! Big Shot, the Circle #2 and Island Floral die-cuts.


Isn't it cute? I can just see making a bunch of these for my neices! It was really easy to make and I plan to make more of these in a few weeks when I replenish my supplies.

For this pin, the SU! products used were the Big Shot (#113439), Standard Cutting Pads (which come with the machine), Circles #2 die-cut (#114526) and the Island Floral die-cut (#118871). I used the Summer Sun corduroy button, however I'm sad to say this line is retiring. Be sure to visit my online store to see if there are any left! But don't worry, in just 8 days the new catty will be released and I'm sure you'll be happy with some of the new offerings!!


Would you like to make you're own flower pin? Well then, check out this great tutorial by Tami White!