First, I want to thank everyone who visited my blog during the Royal Blog Tour. I hope you enjoyed the tour!
And the winner of the set of four paperclip-bookmarks I created for the RBT is...
Ola from Indiana!
Congrats Ola! I will be mailing your blog candy soon!
Now, many of you asked for directions and such and I will not disappoint. Please check back tomorrow and I will provide you receipes as well as links to tutorials and the demos who inspired me.
Again, thank you for your visit and for helping to make the Fall Royal Blog Tour such a huge success!
Nov 10, 2010
Nov 4, 2010
Fall Royal Blog Tour
Welcome to my Castle! I hope your journey so far as been fun and you've enjoyed the wonderful treats the other Princesses have shown you.
I have four projects I will be sharing with you, each using the set Merry Crittermas, which can be purchased from the Holiday Mini Catalog.
I thought long and hard about what kinds of things I wanted to make for you. I wanted them to be things that could be easy and quick to make. Thats when I thought, why not make small items that can be used as stocking stuffers, treats for co-workers, small gifts that your child can give to their teacher, etc.
The first project I have for you can fit all three of the categories. What I've made for you a small gift card which holds inside a lip balm!

This is versatile and the lip balm can be replaced with several things, such as lip gloss or a small pack of gum. Here is a view of the inside of the card:

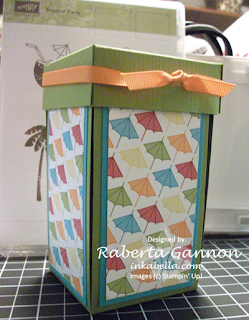
The next project I created for you are these adorable triangle treat containers. Let your imagination have fun deciding what to place inside these.

The third project I came up with is a bookmark made out of a 4 inch silver paperclip. Super easy and fast to make.
 Here is a close up view of each of the clips.


Do you like those bookmark-paperclips? Well then great because I'm giving them away as Blog Candy!! Just post a comment and be sure to leave me your email address to be entered into my giveaway. I will be randomly choosing a winner which I will annouce on this blog after the Tour! And I will ship overseas!
Please note, if you fail to leave your email address I cannot contact you if you win!
For those of you who feel uncomfortable with leaving an email address in a post, you can write your info like this: yourname at emailaccount dot com
I hope you've enjoyed your visit and the treats I've prepared for you. Please step back on the carriage and it will take you to the next castle on your trip. Safe Journey and please be sure to visit again!
I have four projects I will be sharing with you, each using the set Merry Crittermas, which can be purchased from the Holiday Mini Catalog.
I thought long and hard about what kinds of things I wanted to make for you. I wanted them to be things that could be easy and quick to make. Thats when I thought, why not make small items that can be used as stocking stuffers, treats for co-workers, small gifts that your child can give to their teacher, etc.
The first project I have for you can fit all three of the categories. What I've made for you a small gift card which holds inside a lip balm!
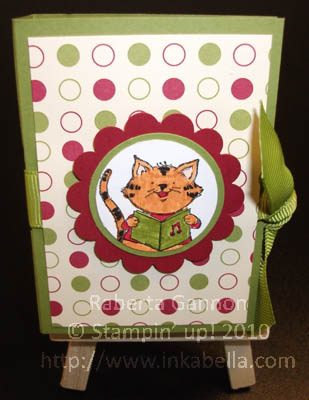
This is versatile and the lip balm can be replaced with several things, such as lip gloss or a small pack of gum. Here is a view of the inside of the card:

The next project I created for you are these adorable triangle treat containers. Let your imagination have fun deciding what to place inside these.

The third project I came up with is a bookmark made out of a 4 inch silver paperclip. Super easy and fast to make.
Here is a close up view of each of the clips.

Do you like those bookmark-paperclips? Well then great because I'm giving them away as Blog Candy!! Just post a comment and be sure to leave me your email address to be entered into my giveaway. I will be randomly choosing a winner which I will annouce on this blog after the Tour! And I will ship overseas!
Please note, if you fail to leave your email address I cannot contact you if you win!
For those of you who feel uncomfortable with leaving an email address in a post, you can write your info like this: yourname at emailaccount dot com
I hope you've enjoyed your visit and the treats I've prepared for you. Please step back on the carriage and it will take you to the next castle on your trip. Safe Journey and please be sure to visit again!
Oct 25, 2010
MDS Mondays, #2
Hello Again
Its a new Monday and time for another MDS Monday's Sketch

Its a new Monday and time for another MDS Monday's Sketch
To play along, just make a project using the provided sketch and upload it to your blog or online gallery. Then leave a link to your project using the widget at the bottom of this post.
If you upload it to an online gallery, could you please use the tag MDSM001 to make it easy to find?
I can't wait to see what you come up with!
To start, here is what I came up with! I made this card in My Digital Studio.

Oct 18, 2010
MDS Mondays
Hello again everyone, its another Monday!
In my previous "MDS Mondays" post, I stated the plan was to post a sketch every Monday. We'll, I think I was too optimistic about this taking off. I know that I've found my myself making more time, but well, this blog doesn't get much traffic (yet I hope :)) so I'm revising it to a new sketch every two weeks on Monday!

Once again, here is the sketch for MDS Monday #1.
To play along, just make a project using the provided sketch and upload it to your blog or online gallery. Then leave a link to your project using the widget at the bottom of this post.
If you upload it to an online gallery, could you please use the tag MDSM001 to make it easy to find?
I can't wait to see what you come up with!

The link for this MDS Monday has been closed.
In my previous "MDS Mondays" post, I stated the plan was to post a sketch every Monday. We'll, I think I was too optimistic about this taking off. I know that I've found my myself making more time, but well, this blog doesn't get much traffic (yet I hope :)) so I'm revising it to a new sketch every two weeks on Monday!

Once again, here is the sketch for MDS Monday #1.
To play along, just make a project using the provided sketch and upload it to your blog or online gallery. Then leave a link to your project using the widget at the bottom of this post.
If you upload it to an online gallery, could you please use the tag MDSM001 to make it easy to find?
I can't wait to see what you come up with!
And here is what I've come up with using this sketch!
The link for this MDS Monday has been closed.
Oct 13, 2010
New My Digital Studio Downloads!
I'm very excited to share that there are new downloads for My Digital Studio! These were released yesterday and are prefect for your Halloween and Thanksgiving projects!
Item Description Price
122174 Nite Owl Digital Kit $7.95
122175 Autumn Spice Digital Kit $9.95
122176 Deck the Halls Photocard Digital Kit $3.95
122177 Candy Cane Lane Photocard Digital Kit $3.95
123728 Celebrations Digital Kit $9.95
122166 Brad Add-On Pack $0.95
If you would like to view the complete list of My Digital Studio download offerings, from my Online Store > click on Shop Now > Digital Crafting > Newest Downloads.
Oct 11, 2010
MDS Mondays (#1)
I'm so excited to start MDS Mondays!
The plan is for me to provide you a sketch every week using My Digital Studio. Hopefully the sketch will inspire you. However, you are not restricted to using MDS to make your project - its up to you how you use it! You can create your project traditionally, or you can make it in MDS ... or using both ways create a hybrid!
 Here it is! I decided to start with what is likely more of a scrapbook sketch.
To play along, just make a project using the provided sketch and upload it to your blog or online gallery. Then leave a link to your project using the widget at the bottom of this post.
If you upload it to an online gallery, could you please use the tag MDSM001 to make it easy to find?
I can't wait to see what you come up with!
And to hopefully get the inspiration going, here is my project!

The link for this MDS Monday has been closed.
Something New!
First, I must apologize for the month absence! It has been super busy for me, and I haven't been home very much. I've been working on some things (such as the Royal Blog Tour coming up!), but because I've not been home, my crafting time has severly suffered.
To that end, I've decided to try something new! I love My Digitial Studio and have been wanting to find a way to use it more. Therefore, I have decided that today beings MDS Mondays!!
Every Monday, I will share a sketch with you to use as you please. I'm setting up a Mister Linky account so that you can then share with me your great creation! I'm hoping that this will be a lot of fun and show the great versatility of My Digital Studio.
And to make it even more fun, you don't have to make your project in MDS, or you can make it a hybrid! Start your project in MDS, print it out and add finishing touches! My goal is to have some fun, get inspired and hopefully help inspire others!
All you'll have to do its create your project, post it to your blog, and then come back here to share the link to your post!
I'll be posting my first sketch shortly and I hope you'll participate.
Sep 13, 2010
The merge is nearly done
Previously I had a blog titled "Wonder Stamping". When I decided to give my business a name and register a domain, I decided to create a new blog-- Inkabella Designs.
I've just finished importing my posts from my previous blog, but now I need to go through them to insure the photos also imported. Please bear with me as I finish my conversion.
I did teach a very small class last night on how to make the quilted "rag bag" purses. We had a lot of fun and will be getting together again next weekend to work on another bag. I also taught how to make those cute fleece flower pins that have been showing up around the internet world a lot recently. I will post pictures tonight.
If you're in the Sacramento area and would like to get together for some stamping, I'm holding a workshop on Saturday, September 18th from 12:30 to 2:30 at the Round Table Pizza at 1307 Florin Road. The cost is $10 and we will be making 3 projects. I will share photos soon! They have an all you can eat buffet from 11:30 to 1:30 if you wish to show up a little early for lunch.
Hope to see you there! Happy Stamping! ♥
Sep 3, 2010
She's at it again!
Our list mom, Sherrill Graff, over at the Yahoo Group Late Night Stampers is at it again. She's offering another giveaway!
Thanks so much for visiting my blog today. Here is your chance to play along with our Late Night Stamper game.
my clue is : Beautiful Wings, Page 215
collect all 20 clues and turn your answers into to Sherrill Graff at istmpnv@aol.com
She will pick the winner to our $400 stampin up shopping spree soon, so hurry!
For more information, visit her blog at http://latenightstamper1.blogspot.com/
Enter today
Holiday Mini Share - Tags til Christmas
 I was able to participate in a Christmas card swap and wanted to share with you all the card that I made.
 I used the Tags til Christmas set from the new Holiday Mini (page 24). I used our Shimmer Paint in Platinum (Item #116807) and mixed it with some rubbing alcohol to make a shimmer paint spray. I then sprayed a sheet of whisper white cardstock. After it dried and the alcohol evaporated, I stamped the ornament image in Cherry Cobber. You can see some of the shimmer. I then used our Rhinestones (#119246) to add a little more sparkle.
 Here is the list of items I used to make this card:
Stamp Set: Tags til Christmas
Ink: Cherry Cobbler (stamp pad), Old Olive (marker)
Card Stock: Cherry Cobbler, Old Olive, Confetti white, Whisper white
DSP: Brights--Patterns Designer Series Paper Stack
Assessories: Basic Rhinestones, Vintage Wallpaper Embossing Folder, Big Shot
I'm planning a Tags class coming up in the next couple weeks. If you would like to host a workshop and earn this set (or others) for free, contact me to set up a time thats best for you! I even offer one-on-one workshops if you want to just get together and stamp!
I hope you enjoyed this share! Please leave a comment and let me know what you think. I love hearing from you.
Happy Stamping! ♥ Raberta
Sep 1, 2010
New SU! Holiday Mini

Its September 1st and do you know what that means? It means its time for a new Holiday Mini from Stampin' Up!
From September 1st until January 3, 2011 Stampin' Up! has a lot of new wonderful products for you to enjoy!
To download a copy of the Mini in pdf, Click Here!
If you would like to download the Stampin' Supplies pdf, Click Here!
I hope you're just as excited as I am about the new Mini! Stay tuned for information on upcoming classes and projects using some of the great sets from the catalog!
Aug 30, 2010
New Honorary Queens for the next Royal Blog Tour

Congratulations to the winners.
Look for their castles on the upcoming Royal Blog Tour!
Aug 16, 2010
Quilted "Rag Bag" Using SU Scallop Square
 Its been a long time coming, but I finally made my very own "Rag Bag" using the Scallop Square and the Big Shot.
My grandmother passed away just over two and a half years ago. Before she passed away, she told my sister that should she pass on, she wanted me to have her sewing machine. I think that of everyone in our family, she felt I would be the one to put it to the best and most use.
Well, I'm sad to say that it sat in its box all this time. I thought about using it and designed some projects, but never got around to pulling it out and using it. Every time I thought about it, I thought of her and missed her all over again.
Well, last night a friend and I got to talking about different craft projects and ones we started but hadn't gotten around to doing. We both decided it was time to do it now, so we convinced each other to log off the computer and get to work!
It took me a half hour to get re-acquainted with the sewing machine, but I did and this is the result! I should also share that just because my grandmother knew I'd use it, I'm in no way a great seamstress. I actually know just enough to follow a really easy pattern, but I was able to figure out how to do this, so you can too!
Happy Stamping! (And sewing! ♥)
Aug 9, 2010
My first Workshop!
 I held my first ever workshop on Sunday, August 8th. I prepared two projects, a card and a mini milk carton.
Everyone seemed to enjoy themselves and liked the projects, so I count it a success! I am planning another workshop for August 29th. I haven't fully decided on the projects yet, but I do plan to give some sneak peaks for the upcoming new holiday mini.
I wanted to design something that didn't use too many items and that would be easy for those who were new to stamping.
Items used for the card:
Stamp Sets - Awash with Flowers, Because I Care
Cardstock - So Saffron, Basic Black, Whisper White
Ink - Black, Daffodil Delight, Rose Red, Garden Green, Pretty in Pink
Ribbon - So Saffron (retired from SAB 2009)
Other Accessories - Scallop Border Punch
Mini Milk Carton:
Stamp Set - Tropical Party (Summer Mini Catalog)
Cardstock - Whisper White
DSP - Island Oasis (Summer Mini Catalog)
Ribbon - Hemp Twine
Other Accessories - Big Shot, Mini Milk Carton Diecut
Ink - Rose Red
Happy Stamping!
Aug 8, 2010
To Live in Exciting Times...
Its been an interesting ride this past month. Shortly after starting this blog and setting up my new domain, changes within my family happened and I had to focus there. My last post here was literally the last time I had a chance to sit down and design/create something for myself to share.
What were these changes that so affected me? I'm on my way to becoming a mommy. I have a 3-year-old cousin who was placed in the foster system towards the end of May. Since early June, my husband and I were doing what we could to get him placed with us. It was a very frustrating and upseting time because due to the economy a lot of social workers were being laid-off so it was difficult to get in contact with people, and there were periods of time when children didn't even have a social worker assigned to them.
But on July 2nd, the judge ordered placement with my husband and I and we've had him in our lives since then. We didn't have any children of our own (not counting our cats :)) so we were having to learn how to be parents. The first time I heard him call me mommy melted my heart.
So with that being said, things have started to call down (a bit). They will be picking back up again because we're going to adopt and will need to go to classes and such, but I'm ready. :) I've also finally had a chance to sit down and design again!
In fact, I have a workshop scheduled for later this afternoon! I will post pictures of the projects I came up with early this evening once I return from the workshop.
Please keep my family in your thoughts and prayers. Its going to be an interesting ride, and I'm thankful to have this outlet to help me through.
Happy Stamping!
~Raberta
Jun 23, 2010
Gift Card Exploding Box
Hello Stampers!
I'd like to share with you an exploding box I've done altered to fit a gift card!

I'd like to share with you an exploding box I've done altered to fit a gift card!
 I got the idea for this box based on one that was offered in a magazine. The owner of a local scrapbooking store shared the idea with me and I did my best to recreate the box. The directions weren't very easy to follow, and some of the demonsions were very off!
So I took notes as I attempted to make my own version and will be posting a tutorial I've created so that you too can make this box, but without the bumps I hit. :)
 The sample in the magazine used bugs and such on strips of transparancy sheets. I attempted to duplicate this with flowers, but I was not entirely happy with the results.
You can see, based on the shadows from my pictures how some of the flowers kind of float. I may attempt this box again and try another approach with the transparancy strips to see if I can come up with something I'm happy with. For now, my tutorial will leave the decorating of the insides to you, but I will share the information from the magazine article in case you would like to try this for yourself. If you figure it out, I'd love it if you shared. :)

I decided to use this box for my cousin's upcoming 18th birthday, after completing this adorable box, I stepped away for a few minutes to call my sister to discuss plans for the party.
When I returned, one of my kitties decided to leave his own mark on the box. I guess he wanted to leave his own birthday wish. :) Thankfully he gnawed in such a way that I was able to fix the tips and my cousin loved the box.
This box used the Tropical Party and Island Oasis DSP from the Summer mini Catalog. The Summer Mini is good through August 31st so head on over to my online shop and order yours today!
I hope you enjoyed this share! Please be sure to check back soon for the tutorial to make your own Gift Card Exploding Box!
~Raberta Gannon
Sacramento, CA
Chic Fleece Flower Pins - Stampin' Up!
Hello fellow stampers!
Today I'm sharing with you an adorable flower pin I made on Friday using our Stampin' Up! Big Shot, the Circle #2 and Island Floral die-cuts.

Isn't it cute? I can just see making a bunch of these for my neices! It was really easy to make and I plan to make more of these in a few weeks when I replenish my supplies.
For this pin, the SU! products used were the Big Shot (#113439), Standard Cutting Pads (which come with the machine), Circles #2 die-cut (#114526) and the Island Floral die-cut (#118871). I used the Summer Sun corduroy button, however I'm sad to say this line is retiring. Be sure to visit my online store to see if there are any left! But don't worry, in just 8 days the new catty will be released and I'm sure you'll be happy with some of the new offerings!!
Would you like to make you're own flower pin? Well then, check out this great tutorial by Tami White!
Jun 1, 2010
Last Chance List for 2009 posted
Its June 1st and that means its time for us to prepare to say goodbye to stamp sets and accessories to make room for all the new and wonderful things that Stampin' Up! will be adding to their new Catalog! The 2010-2011
Please take a moment to visit the Last Chance Page for all the latest information. The retiring accessories list will be updating daily and all items will be removed from the Online Store as supplies run out.
Welcome to Inkabella!
One of my New Year's Resolutions was to really work on my business this year. I have to admit that I haven't been moving very fast the first half of the year, but then I've had a lot going on. My husband and I are in the process of adopting my cousin. My uncle is no longer able to care for his children and so rather than letting him go into the foster system, my husband and I decided to take him in. We hadn't planned on children for at least another year so this is a big life changer for us.
I have great plans for the 2nd half of the year, even though Convention is not one of them. My cousin needs us right now and so its much better that I stay home this year and settle him in.
To start things off, I decided to name my "company" Inkabella and registered the domain, Inkabella.com. Unfortunately, the blogger name was already taken, so for the blog I went with Inkabella Designs. Until I decide how I wish to utilize my new domain, it will point here, to my blog.
I look forward to sharing many ideas and creating some lasting friendships as we explore the wonderful world of Crafts and all that Stampin' Up! has to offer!
Apr 17, 2010
Shoebox swap and retired colors
I'll be heading out the door momentarily to a downline meeting where we'll be doing a shoebox swap. I've been struggling for nearly two weeks trying to decide what card I will do.

It was literally last night around 4:30 pm that a I decided on a layout and a stamp set. However, thats as far as I got and it was a couple hours later that I came up with the card below.

All colors in this card are retiring at the end of June this year. The only color used here that will remain is Pumpkin Pie.
Here is a list of what I used for this card:
Stamp Set: Circle Circus
Ink: Sage Shadow, Handsome Hunter, Summer Sun, Pumpkin Pie
Cardstock: Sage Shadow, Handsome Hunter, Whisper White
Die-Cut: SU! Top Note
Ribbon: 1/4" Grosgrain in Sage Shadow
I'm off to share! Happy Stamping!
Apr 12, 2010
Ceramic Coasters
I have a craft faire coming up (my first ever!) and I decided to try and make some ceramic coasters. I have been wanting to use my Medallion stamp and so I thought this would be the perfect opportunity.

What do you think?
I stamped these ceramic tiles using close to cocoa craft ink. I heat set the ink by baking them in the oven for about 30 minutes.

What do you think?
Apr 11, 2010
Free Technique DVDs Special Offer
FREE TECHNIQUE DVDS SPECIAL OFFER
Special Offer Dates: April 1-May 31, 2010 (or while supplies last)
Special Offer Details: From April 1-May 31, join Stampin' Up! as a demonstrator and receive two FREE technique DVDs.
Free Technique DVD Details
Description | Retail Value | |
 | Workshop Wow DVD 2008-2009 (140 min.) | $24.95 |
 | Workshop Wow 2007-2008 DVD (117 min.)
| $17.47 |
| Total Value | Over 250 minutes of stamping and paper crafting | $42.42 |
*DVDs are in English only
Contact me today to learn more!
Apr 8, 2010
Its a Color Renovation!
Stamping Up! announced on Tuesday that they were revamping their color families. This would mean we'd be saying a fond farewell to a number of colors. This has sparked many many discussions on all the online communites I belong to.
I wanted a couple days before posting this to see how the "hype" among my fellow demonstrators would pan out. I've been reading different forums discussing Stampin' Up!'s announcement and everyone is reacting on both sides of the spectrum ... from VERY upset to down right "almost peeing my pants" excited. I have to admit, I'm in the middle. I'm very excited about the changes, but also a little disappointed at the loss of some of my favorite colors.


Thanks to Amy for making and sharing these great images.
Mar 29, 2010
Late Night Stampers - Challenge 64
 Today begins a new challenge over at the Yahoo Group, Late Night Stampers. This week is Challenge 64 - Sympathy Cards.
Most of my day today was spent running errands for family. But I was able to work a few minutes here and there to create this card. Not my best work, but I'm happy with it.
If you're not a part of Late Night Stampers, you really should visit and join the group. Its filled with a lot of great people, both demonstrators and non-demonstrators. If you are already a part of the group and haven't done your own card yet for this challenge, what are you waiting for!? :)
Happy Stamping!
Mar 28, 2010
Eggshell Easter Basket


This is accomplished using a 8x8 sized sheet of cardstock. I've considered creating a tutorial for this if others are interested. I'll try to work on this tomorrow and get it up soon.
I hope you enjoy my basket! Happy Stamping!
Mar 15, 2010
A use for retired cardstock
I'm doing a fundraiser at work for March for Babies. We'll be having a used-book sale on Wednesday and so I decided to make some bookmarks to sell in hopes of raising some more cash. These were inspired by my upline, Teri Wells, who shared the idea with us as a past stamp camp. these were made using the Bigshot and the Table Settings Bigz Die-cut.
 I also felt this was a great way to use up some of my retired cardstock. Handsome Hunter is still current, but Cool Caribbean has been retired for a couple years now. I used the Very Vintage jumbo wheel on each.
If you're at all interested in helping out, please stop by and sponsor me for the walk on April 24th. Visit Marchforbabies.org and see if there is a walk near you!

Finally ... a post!
After a long while, I finally created something!

This card was inspired by Wendy Hawkinson. The file is an animated gift so that you can see the inside and outside (Hopefully it works). I'm still learning how to use a photo box I've made to try and take better photos.
Enjoy and Happy Stamping!

This card was inspired by Wendy Hawkinson. The file is an animated gift so that you can see the inside and outside (Hopefully it works). I'm still learning how to use a photo box I've made to try and take better photos.
Enjoy and Happy Stamping!
Feb 20, 2010
Baby Shower Banner and Party Favor
 The Baby shower went very well. I decided to make a banner for my sister. They decided to name their daughter KaeLynne. I know the name is a hybrid of two names, the only one I'm sure of is my sister's middle name.
 I used the Serif Essentials Alphabet and cut out each letter in Melon Mambo cardstock. I used the Designer Series Paper Pad, Welcome Neighbor from the Sale-A-Bration. I decided to use the Pretty in Pink sheet with white hearts, and cut out 3x3 sheets to adhere each letter to. I then attached each square to the Melon Mambo polka-dot grosgrain ribbon.
I used a key-ring and folded over the end of the ribbon to allow my sister to hang it from a hook or push pin.
I wanted to add a few little elements to the banner to really make it stand out and so I used the Love You Much stamp set and the Heart to Heart punch, as well as the Beautiful Wings Embosslits Die from the Occasions Mini. I stamped the three hearts in Rose Red on White cardstock and then used the Heart to Heart punch. I used the Beautiful Wings embosslit and punched out butterflies in Pretty in Pink, Certainly Celery, and So Saffron. I also used the Butterfly punch with So Saffron, spraying it with a mixture of alcohol and Champagne Mist Shimmer Paint to add a little sparkle.
The banner was such a hit, I was asked by several people to make one for them or their children.
For the party favor, I enlisted the help of my niece who I've hooked on crafts. There wasn't an "It's a Girl!" paper from SU!, so my niece choice the paper we used. We cut them into 4x4 squares to cover a coaster, using the 3/16" corner rounder punch to match it to the coaster.

We used the Whimsical Words set from Sale-A-Bration, stamping "happiness always" in rose red. We then punched it out with the Scallop Oval punch and sponged the edges with Rose Red. The flowers are from the Vintage Vogue set in the Occasion Mini. We stamped the small flower in Pretty in Pink and the large flower in Rose Red. We cut out both flowers and then pierced them together with a gold brad.
These were also a big hit, my sister making sure there were extras that she could take to work and hand out to co-workers who weren't able to make it but had sent gifts.
It was nice to finally get the time and motivation to be creative again. Since my uncle's passing in December, the fire just wasn't there. I do have a couple more projects to share and will post soon. I also hope to have new projects to share in the coming days as well.
Thanks for visiting, I hope you enjoy my share.
Happy Stamping!
Raberta
Sacramento, CA
Jan 17, 2010
Turtle Punch - Using MDS
At last, I'm sharing what will be my first insert in my chipboard album, a punch animal!
As I was trying to decide how to create this cute guy with current punches (we no longer have the 1/4 and 1/8 inch circle punches), I realized that with My Digital Studio I had a whole new area I could explore.
I played with the different punches available in the program, calculating the width and height for each type of circle needed.
Below is the sheet I will be printing out to insert in my album. I gave the measurements for each circle, converting from the 1.25 inch.
The modern label, 3/4, and 1 3/8 inch circles are Garden Green with a mat of Always Artichoke.
The 1 1/4 inch circle is Always Artichoke.
The 1/4 inch circles are Certanly Celery with a mat of Old Olive.


Isn't he adorable?!
As I was trying to decide how to create this cute guy with current punches (we no longer have the 1/4 and 1/8 inch circle punches), I realized that with My Digital Studio I had a whole new area I could explore.
I played with the different punches available in the program, calculating the width and height for each type of circle needed.
Below is the sheet I will be printing out to insert in my album. I gave the measurements for each circle, converting from the 1.25 inch.
The modern label, 3/4, and 1 3/8 inch circles are Garden Green with a mat of Always Artichoke.
The 1 1/4 inch circle is Always Artichoke.
The 1/4 inch circles are Certanly Celery with a mat of Old Olive.
I hope you enjoyed this share!
Happy Stamping!
Jan 6, 2010
My Chipboard Album
I’d like to share with you today a project that I’ve started in which I hope to collect and share many different punch creations using Stampin’ Up! Punches.

To store all these ideas, I decided to create my own album using one of my favorite papers currently available, Razzleberry Lemonaide.
I was able to make this album using 99% SU! items. The only item we don’t sell are the posts. J You can get those at any craft/scrapbooking store.
This paper set uses mostly the new in-colors, and contains my two favorite from that set, Rich Razzleberry and Melon Mambo.

Using the On Board Basics, you can create your own album.
As you can see in the pictures below, for the cover I actually cut off about an inch and put maybe a 1/16 of an inch between the two pieces of chip board to allow for the cover to bend.
The inserts are 6x6 post album inserts (item #103687, $6.95). Each package comes with 20 sheets.

This is the outside view of the album. Once I start filling in the page, I suspect that the posts won't show so much. But then, I'm also hopeful that I'll have a lot to share and will need to buy post extenders at some point.
 Here is the view of the inside of the album. I covered the inside using Rich Razzleberry.
 And finally, here is a viewshowing how the cover bends after I cut off about an inch of the chipboard and then left about 1/16 of an inch between the two pieces when I covered it with the paper. I'm sure you notice the slight shine to the paper. I decided to cover it with contact paper in order to protect it.
I hope you've enjoyed my little share here. Now its time to decide what will be the first punch project to share and place inside!
Thank you so much for visiting and Happy Stamping!
Raberta Gannon
Sacramento, CA
(P.S. Perhaps its time to play with MDS again and create a signature :))

To store all these ideas, I decided to create my own album using one of my favorite papers currently available, Razzleberry Lemonaide.
I was able to make this album using 99% SU! items. The only item we don’t sell are the posts. J You can get those at any craft/scrapbooking store.
This paper set uses mostly the new in-colors, and contains my two favorite from that set, Rich Razzleberry and Melon Mambo.

Using the On Board Basics, you can create your own album.
As you can see in the pictures below, for the cover I actually cut off about an inch and put maybe a 1/16 of an inch between the two pieces of chip board to allow for the cover to bend.
The inserts are 6x6 post album inserts (item #103687, $6.95). Each package comes with 20 sheets.
This is the outside view of the album. Once I start filling in the page, I suspect that the posts won't show so much. But then, I'm also hopeful that I'll have a lot to share and will need to buy post extenders at some point.
 Here is the view of the inside of the album. I covered the inside using Rich Razzleberry.
 And finally, here is a viewshowing how the cover bends after I cut off about an inch of the chipboard and then left about 1/16 of an inch between the two pieces when I covered it with the paper. I'm sure you notice the slight shine to the paper. I decided to cover it with contact paper in order to protect it.
I hope you've enjoyed my little share here. Now its time to decide what will be the first punch project to share and place inside!
Thank you so much for visiting and Happy Stamping!
Raberta Gannon
Sacramento, CA
(P.S. Perhaps its time to play with MDS again and create a signature :))
Jan 5, 2010
Sale-A-Bration 2010 and Occasions Mini Begins!
.jpg)
Today begins Stampin' Up!'s Sale-A-Bration 2010! This is a great opportunity to earn some lovely stamp sets, paper and this year, a new punch!
For more informaiton on Sale-A-Bration, you can visit here. If you would like to see the supplies used for the projects in the Sale-A-Bration cataloge, you can download them here.
One of the newest products I would like to share with you are clear stamps!

Each of the stamp sets available in both the Sale-A-Bration cataloge and the new Occasions Mini are available in the traditional wood mounted set, as well as a clear stamp set. The clear sets come in a DVD sized container for ease of storage. To learn more, please visit here.
As I shared, along with Sale-A-Bration begining today, the Occasions Mini is also available today. You can download a copy of the pdf file here.
 I'm very excited for the new offerings Stampin' Up! has provided for us and cannot wait to share projects with you.
Happy Stamping!
Raberta Gannon
Sacramento, CA
Subscribe to:
Comments (Atom)